
It’s Easier Than You Think
First, Go into your console settings and set your Wii Consoles Date and Time correctly.
Then, While in your Wii console settings connect the console to the internet by scanning for your WiFi network and and connecting to it.
Next, Update your Wii to the latest firmware. You need to be on 4.3U System Menu Firmware to mod your console.
NOTE: You only need to connect your console to the internet if you are needing to update to 4.3U. If you are already on 4.3U you can skip connecting the console to the internet if you’d like.
Alternatively: If for some reason you can’t connect your console to the internet to update the system firmware to 4.3U you can use just about any Wii game made by Nintendo on after 2010 to update your console to 4.3U. Just run the disc and follow the prompts to update. The updater is on the disc itself.
Remember, There is more than one way to mod a Wii Console. We have boiled the process down into this fairly straightforward and simple guide for you. If you follow our guide you will be successful in modding your Wii Console providing you access to to over 12,000 total vintage and retro video games.
Format An SD Card
Please Do Not Format Your Mariogasm SD Card To Do Letterbomb!
Use a separate card or order one of our custom Letterbomb cards for your console.
Obtain a 1GB or larger standard SD card and insert it into a Windows PC. Open “This PC” or “My Computer” and right click on the SD card. Select “FORMAT” from the drop down list. If you have an option of how to format the SD Card select FAT32, otherwise Windows will typically auto format SD cards to FAT32.
Next, Follow the instructions below to download and run Letterbomb on your Wii Console allowing access to the consoles reserved system NAND memory.
Letterbomb

After setting the date and time and confirming you are on 4.3U, let’s blow up your console! LOL Just Kidding. We didn’t create letterbomb but it is the tool that we use to access the consoles nand memory to install BootMii and the Homebrew Channel. Which is your first step to a modded console.
Go To Letterbomb
To use Letterbomb, go back into your Wii console settings and make note of your consoles MAC Address. Enter your consoles MAC address into Letterbomb being certain to select 4.3U for a U.S. Wii or the appropriate version for your region. If you are modding a Japanese or Korean console then select either 4.3J or 4.3K instead of 4.3U and then follow the rest of our instructions.
After selecting your menu version and entering your MAC address you want to DOUBLE CHECK it. Make sure your info is right. Then select cut either red or blue wire. It doesn’t matter which one you pick. This will download the Letterbomb .zip file to your downloads folder.
Next, copy the Letterbomb file you downloaded over to the SD card you just formatted. You want to extract the contents of the Letterbomb file onto the highest level or “ROOT” of the SD Card. You do this by either choosing the “Extract Here” option while opening the file or just making sure that any files created inside a folder when you extract them are manually copied and placed into the top folder or “Root” folder of the SD card.
Now, remove the SD card from your computer and insert it into your Wii Consoles SD Card Slot. Make sure your Wii is powered off.
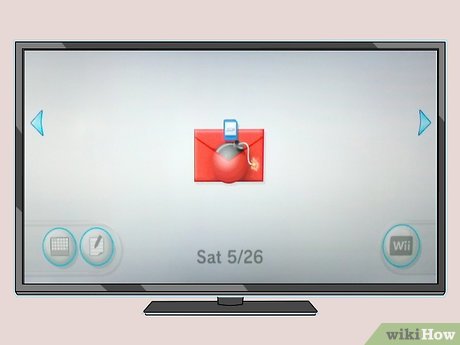
You have already set the date and time previously so now power on your Wii Console and and navigate to your mailbox in the lower right of you system menu screen with your Wii Remote.
Open your mail and go forward a day and back a day or two until you see the icon on the right there. Click on the red Letterbomb with your Wii Remote to launch it.
View the warning by the creators of Letterbomb. Just remember you need to own any games you use through Homebrew.
Press A on your Wii Remote to Continue.
Installing The Homebrew Channel and BootMii
After Letterbomb loads you are ready to install The Homebrew Channel and BootMii. Collectively this is the second step in modding your Wii console.
First, Go ahead and follow the on screen prompts to install the Homebrew Channel. This is easy and fast.
Next you want to install BootMii. This is the program that installs into your system nand memory and allows us run Homebrew apps and games off of Wii SD cards and hard drives.
Follow the on screen prompts to install BootMii. Choose “Install as Boot1” if available otherwise choose “Install as an OS” either method works fine.
With the Homebrew Channel and BootMii now installed on your Wii console it is time to install the cIOS files which tell your console how to run the emulators.
Installing cIOS On Your Wii Console
Exit the BootMii install app by pressing the “Home” button on your Wii remote and choosing to return to the Wii System Menu. Next open the Homebrew Channel launcher from the Wii system menu screen. Remember you installed the Hombrew Channel in the previous step. A channel button for it is now on your system home menu.
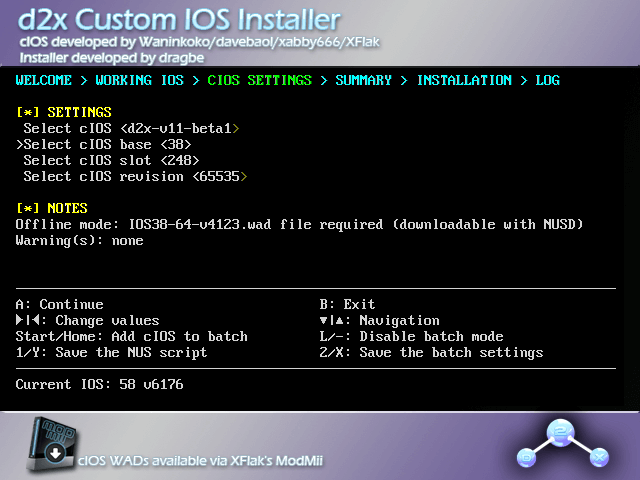
Navigate to the Homebrew app titled “d2x cIOS Installer”.
Open the cIOS installer and under the Settings tab select the following options you see in the image to the right and Press A to continue.
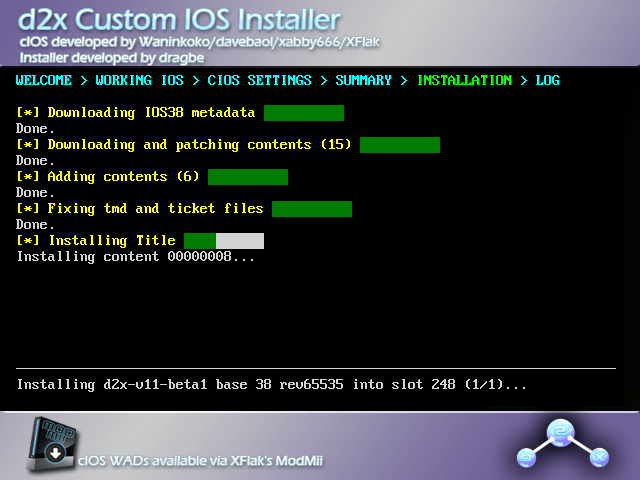
cIOS Files Are Now On The SD Cards
You no longer need to connect your console to the internet to do this step. We have included the cIOS files that you need on every SD card we sell. Simply open the d2x cIOS Installer and follow our instructions.
Green is a successful cIOS install. 1 cIOS install down and 3 more to go!
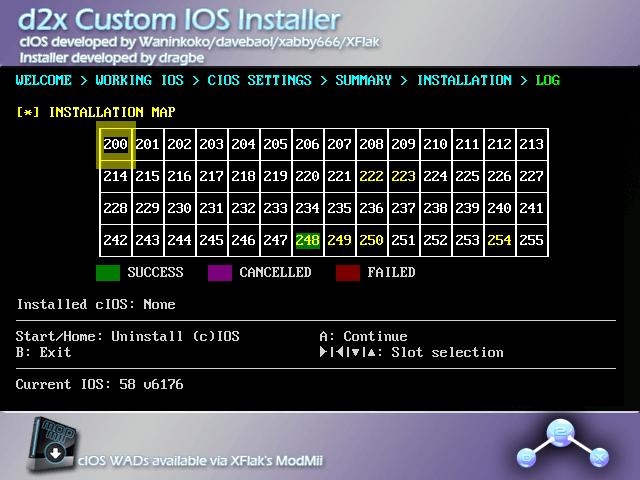
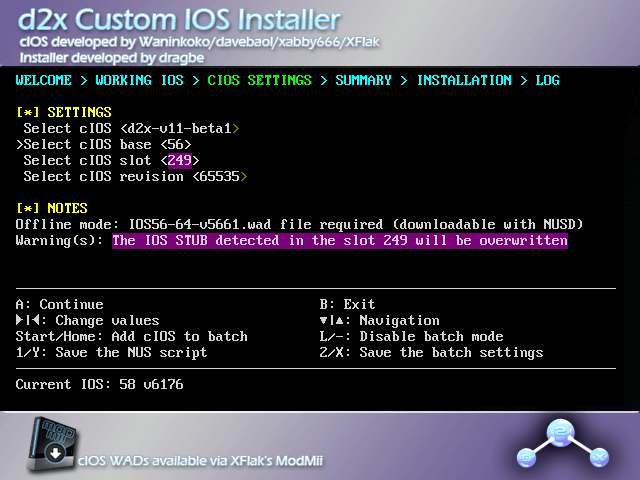
Now install cIOS base 56 into slot 249. Make sure your settings match the image on the left and Press A on your Wii remote.
Next install cIOS base 57 into slot 250. Make sure your settings match the image on the right and Press A on your Wii remote.


Then install cIOS base 58 into slot 251. Make sure your settings match the image on the left and Press A on your Wii remote.
Congratulations you are almost done. Now go ahead and Press B to exit back to the Homebrew Channel.
Install The Wii Flow Channel To Access Your Game Library and Emulators
This step is highly recommended. Wii Flow is one of the best ways to manage your game library. It’s also the app you see in our product images for modded Wii consoles. Following this step will set your console up like an official Mariogasm Modded Wii.
In the Homebrew Channel navigate to an app called “Wii Flow Channel Installer”. Open the app and follow the on screen prompts to install the channel to your newly modded Wii consoles system home screen. This only takes a moment. Go ahead and exit when its done.


Add a skin to Wii Flow. By itself the Wii Flow Channel is functional yet boring so lets add a skin or theme to the channel. Do this by opening the “Wii Mod” app in the Homebrew channel.
Open Wii Mod and choose SD Card as your source. Then you will see the list in the image to the left. The bottom 8 files are all Wii Flow Channel Themes we use 8bit by default but feel free to try any of them. Choose a theme and Press A to install it. Press B to exit. To try different themes just repeat this process with a theme of your choice.
At this point you may also install home screen channel buttons for the individual emulators also from Wii Mod.


That’s It! Your Wii is modded. Congratulations on your success. Your system home screen should look very similar to the screen on the left and now Wii Flow is ready to organize your vintage video games collection!
Thanks For Checking Out Our Guide
This isn’t the only way to mod your Wii console. Our friends over at Wii Hacks Guide have written a very thorough and in depth guide to everything Wii modding including the Mini and the vWii on your Wii U. We learned our skills from them so check them out.
Additionally, our Mariogasm Wii SD Cards are a great way to start with your Wii mod. Our SD cards are loaded with Homebrew apps and vintage video games. You can purchase a Wii SD card individually or bundled with a Wii Hard Drive that is pre-loaded with Wii and GameCube games.
Check Out our Wii SD cards and HDD’s in our “Loaded Drives” product category here:
Modded Wii SD Cards and HDD’s